Installing dependencies for some community packages
Because Pulsar runs on Electron, it is able to use Node modules to complete tasks. Node modules, though written in JavaScript, sometimes also use code written in a lower-level language and bridged to JavaScript. We’ll refer to these as native modules.
Because native modules are compiled in a language like C++ or Rust, they need to be tailored to your processor architecture, operating system, and version of Node and/or Electron.
If you want to install a community package that uses native modules, this usually requires that you have a local toolchain for building native modules in Node:
- A C++ compiler like
gccorclang - A recent version of Python
If not, your computer may require additional setup.
Setting up a build toolchain on your platform
Different operating systems have different toolchains, so choose the section below that corresponds to your operating system.
Linux
Building native modules for Node on Linux will require gcc and python.
On Debian/Ubuntu systems, this could be as simple as running apt install build-essential. Other distros will have an equivalent package that installs gcc and its associated tools.
It’s extremely likely that your system already has a working version of Python; if not, you can install Python 3 from your distro’s package manager.
You can verify that your system has all the needed tools by running ppm install --check. (Depending on how you installed Pulsar, you might need to install shell commands first, as described in the Adding terminal commands article.)
If ppm install --check produces errors, visit the section below to troubleshoot.
macOS
Building native modules for Node on macOS will require clang and python.
macOS users will be prompted by the system to install Xcode command-line tools the first time they run git, gcc, or clang. You can also run xcode-select --install to trigger the prompt. macOS will download and install the tools automatically. A full installation of Xcode is not necessary.
You can verify that your system has all the needed tools by running ppm install --check. (Be sure to install shell commands first, as described in the Adding terminal commands article.)
If ppm install --check produces errors, visit the section below to troubleshoot.
Windows
To be able to build native modules on Windows, you’ll need to install the following applications:
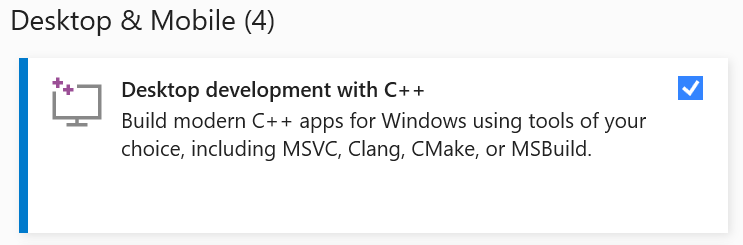
- Build Tools for Visual Studio (or the Visual Studio IDE) with the Desktop development with C++ component
- Python 3 (preferably the most recent version)
Installing Visual Studio Tools
You do not need a full installation of Visual Studio to be able to compile native Node modules. But you do need some components that must be installed via the Visual Studio installer, so visit this page and search for Build Tools for Visual Studio 2022. You will download an installer pre-configured to install these components.
You must also select the Desktop development with C++ component when customizing your installation. This is the component that will allow Node to compile native modules with the node-gyp tool.
If you didn’t install the right things the first time around, you can re-run the Visual Studio installer and modify your installation.
Installing Python
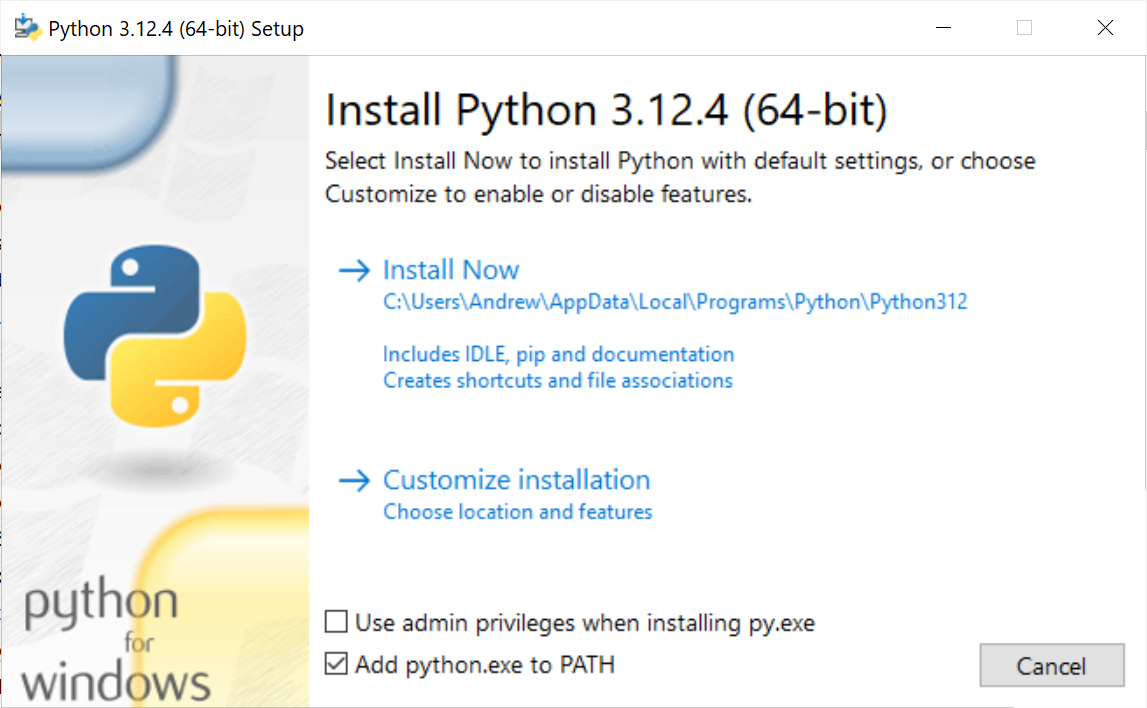
Python can be downloaded from the Python website. The latest version of Python 3 is a good choice.
When you run the Python installer, first enable the “Add python.exe to PATH” option. This will make things a bit easier later on.
Next, choose “Customize installation” and look at the list of options.
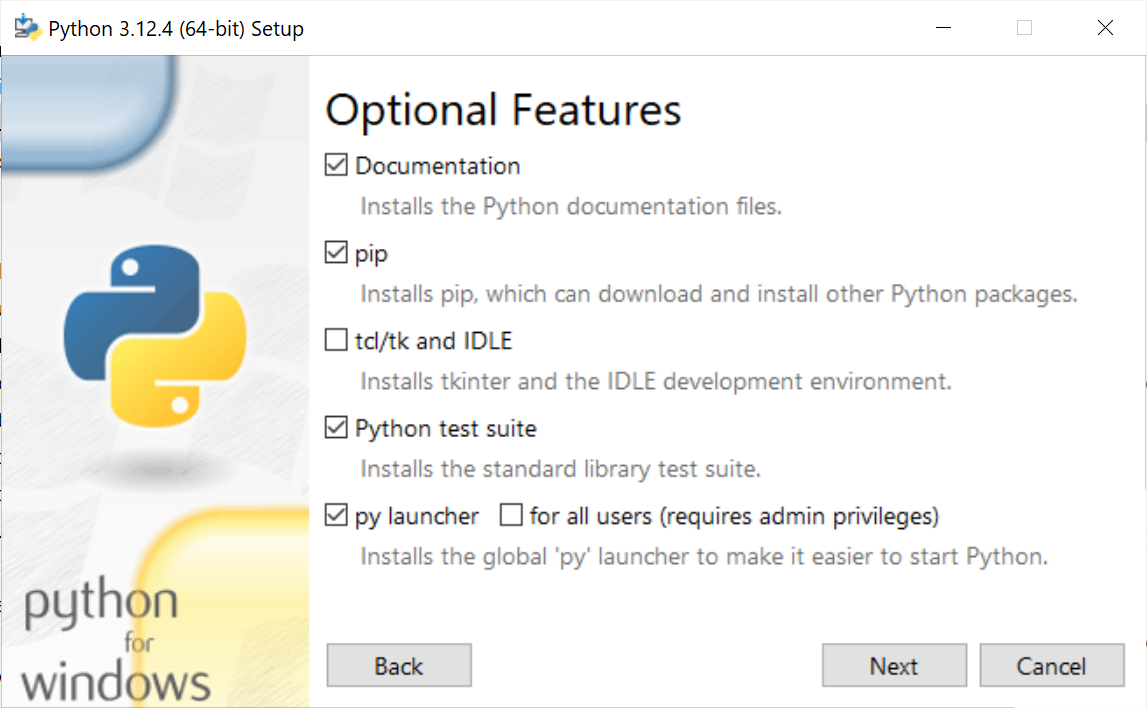
You may deselect most things on this list, but be sure that “pip” is selected, since we’ll need it later on.
On the next screen, you’ll see some more options.
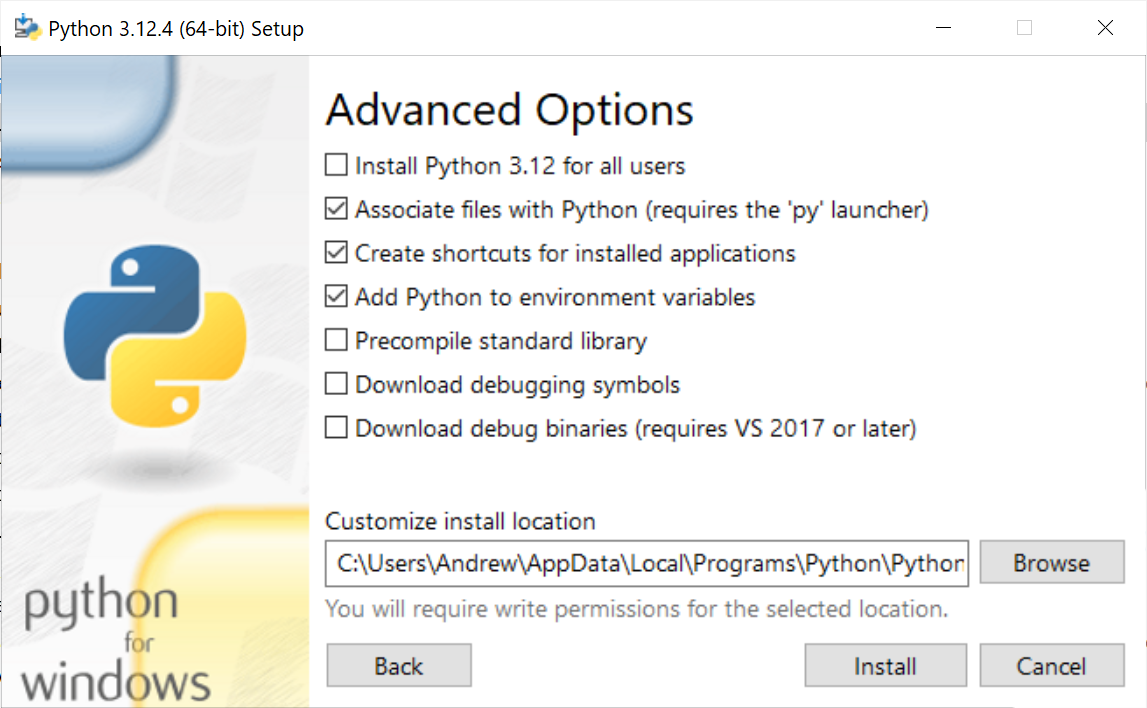
It’s a good idea to select the “Add Python to environment variables” option, since it will make it easier for ppm to find your Python installation.
Please also note where the installer plans to install Python. You might want to select and copy this value so that you can use it later if you need to help ppm find Python.
Checking your path
You should also make sure that you have python in your path. If you were able to check the “Add python.exe to PATH” option during Python installation, then that should be taken care of, but it’s worth making sure.
Open your terminal application and run the following command:
Get-Command python

You may have to make your window wider just to fit the information. In my case, it’s just barely wide enough for me to discern that the Python executable is located at the path C:\Users\Andrew\AppData\Local\Programs\Python\Python312\python.exe.
Troubleshooting with ppm install --check
No matter which platform you’re on, you might run into some minor speed bumps when you try to install a package that uses a native module.
Luckily, we can use ppm itself to help us set up our native module build environment. Run ppm install --check to trigger a special behavior from ppm: it’ll try to compile a dummy native module, then report any obstacles it encountered.

If ppm install --check works and doesn’t raise any errors, you should be able to install packages with native modules!
Otherwise, here are some things to try:
Install setuptools for Python
ppm install --check may complain about a lack of distutils. That’s because Python recently stopped including that library by default — but we can fix that by installing Python’s setuptools package.
Installation will vary based on your platform and how you installed Python.
If you’re a Windows user who installed Python via the instructions above, you can run this command in your terminal:
pip install setuptools(If it doesn’t know what pip is, then your Python path is not set up properly.)
If you’re a macOS user with Python installed, either pip or pip3 will probably exist in your PATH, so you can try pip install setuptools (or pip3 install setuptools).
In some cases, though, it might balk at installing packages directly. For instance, if you installed a recent version of Python on macOS via Homebrew, pip might prefer that you run brew install python-setuptools.
If you’re a Linux user with Python installed, either pip or pip3 will probably exist in your PATH, so you can try pip install setuptools (or pip3 install setuptools).
In some cases, though, it might balk at installing packages directly. For instance, if you’re on Debian or Ubuntu and using a system default installation of Python, pip will likely tell you that you should install setuptools through apt. There are packages called python3-setuptools and python3-distutils, either of which ought to give you what you need:
apt install python3-setuptools # or…
apt install python3-distutils
You may have to add sudo to the beginning of either command.
Other distributions will have their own package systems. In general, those distributions will want you to install Python libraries through their own package managers, if possible. Search for a package with setuptools or distutils in the name; that’s likely to be the one you want.
Hopefully, you’ll succeed at installing setuptools, at which point you should run ppm install --check again. If it still fails, keep reading.
Tell ppm about the path to your version of Python
If ppm still complains about missing distutils after the step above, or if it thinks you don’t have any build tools installed, it might be using a different version of Python than the one you think it’s using.
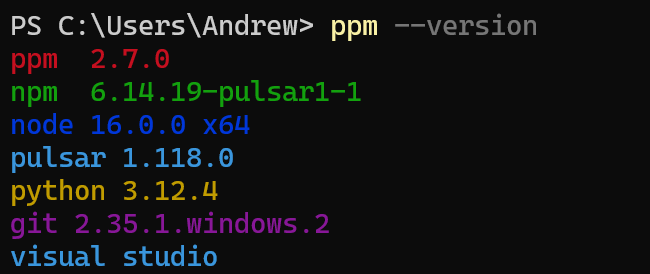
Run ppm --version again and look at the version of Python it reports: if it’s not the version you had in mind, then we’ll need to tell it how to find your Python installation.
First, you should find out the path to the python executable you want to use. Windows users might have it saved from an earlier step; macOS and Linux users might be able to use which python to locate it.
You can tell ppm about your Python executable two different ways, but let’s first try this one:
ppm config set python "C:\Users\(my-user)\AppData\Local\Programs\Python\Python312\python.exe"ppm config set python "/usr/local/bin/python3" # or whatever your path isppm config set python "/usr/local/bin/python3" # or whatever your path isAs always, you should make sure this matches the location of your own Python installation.
After you run this command, try ppm --version again. If it picks up on your new Python version, you’ve succeeded:
If not, you can try the other way of telling ppm about your Python location: the PYTHON environment variable. Run this in your terminal, again confirming you’re using the correct path to your own installation of Python:
$env:Python = "C:\Users\(my-user)\AppData\Local\Programs\Python\Python312\python.exe"export PYTHON="/usr/local/bin/python3" # or whatever your path isexport PYTHON="/usr/local/bin/python3" # or whatever your path isIf ppm recognizes your Python version when you run ppm --version, you should try running ppm install --check again. If it passes, you’ve succeeded!
Ensure you installed your tools correctly
If ppm still thinks you don’t have the right build tools installed, then it’s worth re-checking whether the rest of your compilation toolchain is installed properly.
Re-run the Visual Studio installer and confirm:
- You must have Visual Studio 2022 Build Tools or Visual Studio 2019 Build Tools installed — or the full Visual Studio IDE of either version.
- Select whichever one you have installed and click on Modify.
- You must have “Desktop development with C++” checked. If it is not selected, select it, then click on the Modify button at the bottom right corner of the window. It will install new components; wait for the installer to finish before proceeding.
All the tools you need should be provided with Xcode command-line tools, so revisit the section above and double-check that those tools are installed. For instance, which clang should resolve to /usr/bin/clang, and clang --version should output version information. (If it instead prompts you to install something, you didn’t have everything set up yet!)
Revisit the section above and double-check that those tools are installed. You should be able to run which gcc (or perhaps which clang) and have it locate this tool.
If you had to make any changes here, run ppm install --check again once new tools have been installed.
Installing a package with a native module
Once ppm thinks it can build native modules correctly, put it to the test! You can now try to install a package that depends on native modules.
For instance, you can attempt to install x-terminal-reloaded either through Pulsar or via the command line:
ppm install x-terminal-reloaded
It’s unlikely, but still possible, that you might run into failures here that you didn’t encounter earlier while running ppm install --check. If so, some of the steps above may still be useful.
If you’ve followed the instructions on this page and still can’t get your package to install, join us on Discord or in GitHub Discussions and we’ll try to get you back on track.
Rebuilding packages with native modules
Since native modules have to be built against a specific version of Node or Electron, they have to be rebuilt whenever that version changes.
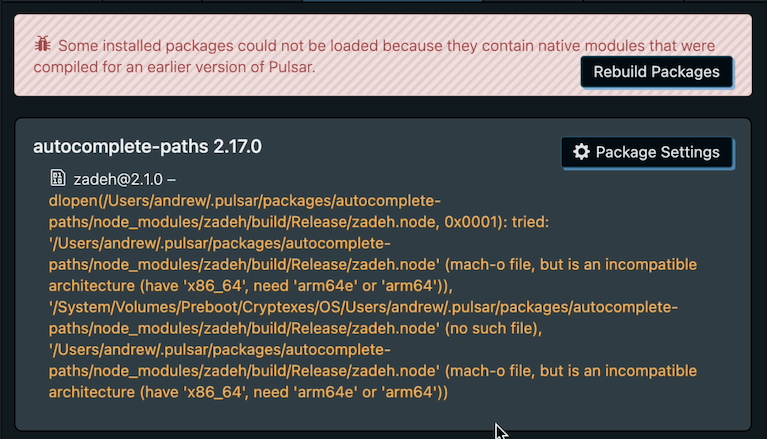
When you upgrade Pulsar, you might occasionaly see an item in your status bar that suggests that some of your packages are incompatible. Pulsar detects this via the built-in incompatible-packages package. Clicking on that status item will show you a list of community packages that need addressing.

When an update results in some of your packages being incompatible, it’s probably because Pulsar updated the version of Electron it uses. There are two common ways of fixing this:
- The author might already have updated the package, in which case the fix could be as simple as installing the update.
- Otherwise, the way to fix this is to rebuild the native module for the current version of Electron — something that Pulsar should be able to do on its own! To rebuild your packages, click the Rebuild Packages button.