Launching Pulsar from the terminal
Pulsar has support for command-line invocation. For instance, you could cd into the directory where your project lives, then run pulsar . to open a window for the project.
It also allows you to manage your installed packages on the command line through a tool called ppm, or Pulsar Package Manager.
About pulsar
At its simplest, the pulsar command launches Pulsar. But it supports some other features that don’t have obvious analogs in the GUI.
Opening a project: pulsar [path]
Opens [path] in a new window as its own project.
Opening a file: pulsar [file]
Opens [file] for editing.
Help screen: pulsar --help and pulsar -h
Displays a list of all command-line switches, including some too obscure to be covered in this documentation.
Version information: pulsar --version and pulsar -v
Shows the versions of Pulsar and its dependencies: Node, Chromium, and Electron.
Each version of Electron is pinned to specific versions of Node and Chromium. If you’re working on a Pulsar package, you might find it useful to know the Node and Chromium versions, since that tells you which APIs are available to you.
Wait mode: pulsar --wait [file] and pulsar -w [file]
Opens [file] for editing, waiting until the file is closed before exiting.
When GUI apps like Pulsar are launched from the terminal, it’s typically a good idea for the terminal not to “wait” for the app to quit. As a user, you probably expect your terminal to offer you a new prompt after the app has spawned. So that’s what Pulsar does by default.
But if you want to use Pulsar for Git-related tasks like interactive rebases and commit message editing, you need it to behave differently — “blocking” while a specific file is being edited.
That’s the purpose of --wait and -w: when called with a specific file path, Pulsar will open that path for editing, then wait until it is no longer active in the workspace before exiting the terminal script that launched Pulsar.
If you want to use Pulsar as an editor for Git commits, interactive rebases, and such, you should add one of these lines to your shell startup script:
# Either of these lines will work on macOS or Linux.
export EDITOR="pulsar -w"
export GIT_EDITOR="pulsar -w"

# This line will work on all platforms.
git config core.editor "pulsar -w"
Safe mode: pulsar --safe
Including --safe with any usage of pulsar will open Pulsar in “safe mode”: no packages will be loaded from the user’s home directory. Only built-in packages will be loaded.
If you think Pulsar might have a bug, safe mode is a useful way to determine whether the unwanted behavior is coming from Pulsar or from a community package you might have installed.
Adding to a project: pulsar --add [path] and pulsar -a [path]
Pulsar projects can have more than one root path. Adding the -a/--add switch to this command will open [path] in the most-recently-used window instead of opening a new one.
Dev mode: pulsar --dev [path]
Opens a new window in “development mode” for [path].
Development mode is a special mode of Pulsar that is useful for developing Pulsar packages or for contributing to Pulsar itself. See Running in development mode to read more about it.
Proxying to ppm: pulsar --package [args] and pulsar -p [args]
Collects all arguments immediately after -p/--package and passes them to ppm, ignoring any earlier arguments.
pulsar -p [args] is thus equivalent to ppm [args] in all scenarios.
The -p/--package switch is most useful for AppImage installations, but you might want to use pulsar -p instead of ppm for your own reasons as well.
About ppm
ppm stands for Pulsar Package Manager. It’s a Pulsar-branded version of npm that installs packages from Pulsar’s own package registry.
It’ll be covered in greater depth later; just know that it’s a way to install Pulsar packages from the command line, and it works whether or not Pulsar is running.
Adding pulsar and ppm to your shell
On some platforms, pulsar and ppm will be immediately available to you after installation. On others, you might have to perform some steps before these commands will work in your shell.
macOS
On macOS, shell commands won’t be installed automatically, but you can trigger their installation via Pulsar > Install Shell Commands. When you select this menu item, pulsar and ppm are symlinked to /usr/local/bin.
If, after installing shell commands, you can’t get your shell to recognize pulsar or ppm, inspect your PATH environment variable and make sure that /usr/local/bin is present.
Linux
deb and rpm installations
The deb and rpm distributions of Pulsar will automatically place pulsar and ppm in your path.
.tar.gz installation
If you downloaded the .tar.gz version of Pulsar, you’ll find that it decompresses into a folder with a pulsar binary at its root. Launching this binary from the terminal will launch Pulsar.
The proper way to use Pulsar from the shell is via a shell script called pulsar.sh that you’ll find inside the resources folder of your extracted download. The ppm command exists inside a deeper folder within the tree.
Once you know where your Pulsar installation will live, you can symlink these scripts into a folder that exists in your PATH.
AppImage installation
The AppImage version of Pulsar works a bit differently. AppImages are entire applications contained in a single file that can live anywhere on disk, much like macOS applications.
When you invoke the Pulsar AppImage file in a terminal, Pulsar executes the same launcher script that is symlinked by the DEB and RPM installations.
For instance, here are some commands you might see in the documentation, and their equivalents for the AppImage distribution (assuming your installation is called Pulsar.AppImage and lives in a directory on your PATH):
Pulsar.AppImage --versionis equivalent to runningpulsar --version(show Pulsar’s version)Pulsar.AppImage --wait foo.txtis equivalent to runningpulsar --wait foo.txt(openfoo.txtfor editing and wait until that file is closed)Pulsar.AppImage --dev path/to/projectis equivalent to runningpulsar --dev path/to/project(open a certain path as a new project in dev mode)
If you’re using an AppImage, here are some suggestions to make it easier to launch Pulsar from the command line:
-
Rename the download. When you download the AppImage distribution of Pulsar, the download file will have a name like
Linux.Pulsar.1.XXX.AppImage(where XXX matches the minor version of the latest Pulsar release). For simplicity’s sake, it’s a good idea to rename this to something short and consistent, likePulsar.AppImage.Ideally, your Pulsar AppImage should be named the same thing on disk no matter which version of Pulsar you’re running. This makes it easier to update Pulsar when new versions come out: rename to
Pulsar.AppImage, then move it to your destination directory, overwriting the previous version. -
Make sure it lives on your
PATH. It’s a good idea for yourAppImagefile to live in a directory that’s already on yourPATH— or to add that directory to yourPATHif it’s not already present. That allows you to invoke the command from anywhere on your system without specifying its full path.The AppImage documentation has suggestions on where you could store your AppImages. Your own distribution may have its own recommended conventions for placement or management of AppImages.
-
Use aliases for speed. If you’ve followed the steps above, you’ll be able to type
Pulsar.AppImageno matter which directory you’re in. But you can simplify it further by defining an alias as described below.
Handling ppm
So it’s easy to run Pulsar itself as an AppImage — but ppm isn’t so straightforward, since an AppImage has only one entry point.
That’s why Pulsar supports a --package flag (or -p for short) that “proxies” to ppm. For instance:
Pulsar.AppImage --package --versionis equivalent toppm --versionPulsar.AppImage -p install linteris equivalent toppm install linter
If the -p/--package flag is present when running Pulsar.AppImage, all arguments before that flag will be ignored, and all arguments after that flag will be passed to ppm in order.
If you follow the advice above, you will be able to launch Pulsar and ppm as follows:
- When you see
pulsarin the docs, replace it withPulsar.AppImage. - When you see
ppmin the docs, replace it withPulsar.AppImage -p.
Using aliases for pulsar and ppm
But we can go further and use aliases to eliminate the difference altogether:
-
Locate your shell’s startup file, or create one if it’s not present. This might be
.bashrcor.bash_profileif your shell isbash, or.zshrcif your shell iszsh. The startup file typically lives in your home folder. -
Add these lines to your shell startup file:
alias pulsar="Pulsar.AppImage" alias ppm="Pulsar.AppImage -p" -
Restart your shell and make sure your new aliases work:
pulsar --version
ppm --version
Windows
Standard installation
The standard Windows installation of Pulsar allows the user to add pulsar and ppm to their PATH; both options are enabled by default during the setup wizard.
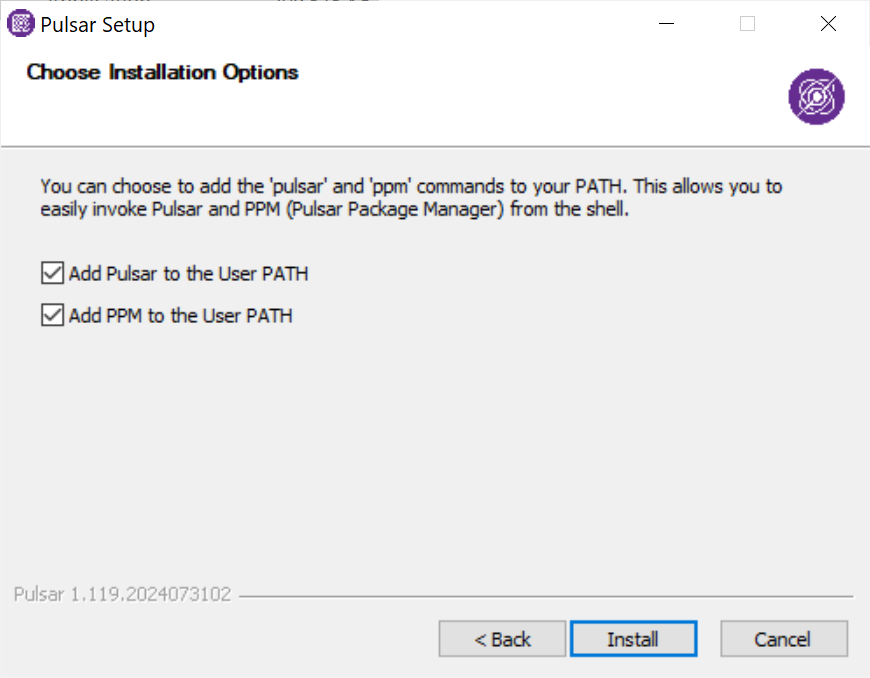
If you want to change this setting, you can run your Pulsar setup file again.
Portable installation and manual modification
The “portable” version of Pulsar for Windows does not use an installer; you can put it anywhere you like on your system and create a shortcut to Pulsar.exe.
For this reason, you’ll have to add pulsar and ppm to your PATH manually. The instructions below also apply for anyone who wants to add the Pulsar directories to their PATH manually (or remove them manually).
First: note where Pulsar is located
On a portable installation, this is a directory of your choice. Note the root directory of your Pulsar installation; consider copying it to the clipboard or saving it in a temporary text file.
If you installed Pulsar traditionally, this will default to C:\Users\(my-user)\AppData\Local\Programs\pulsar (if you installed for just the current user) or C:\Program Files\Pulsar (if you installed for all users).
Edit your PATH manually
Right-click on your Windows start menu and choose Settings. In the window that opens, focus the search field, type environment, and choose “Edit the system environment variables.”
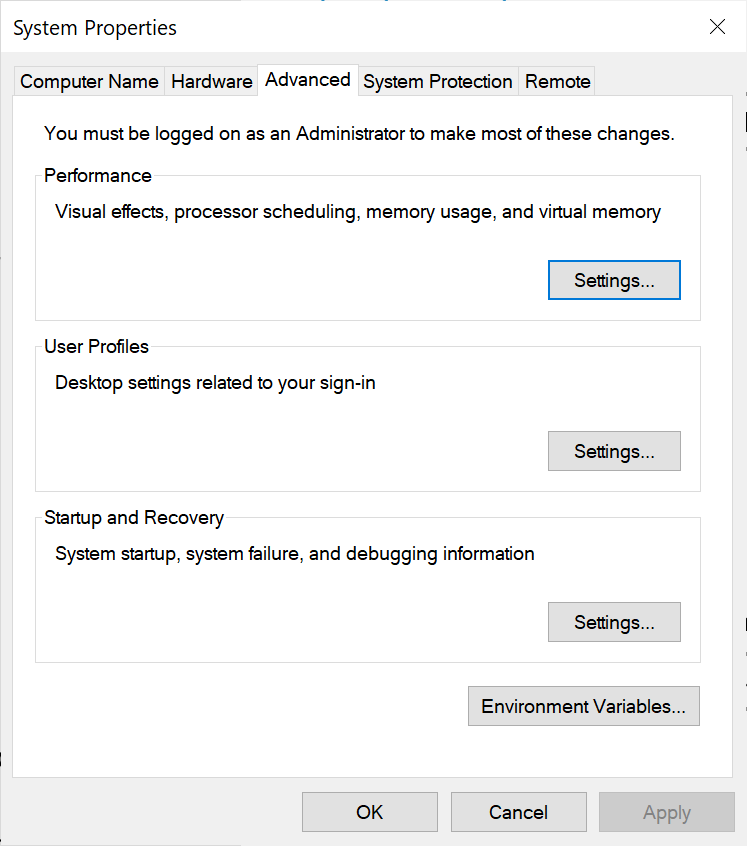
You’ll be taken to the venerable System Properties dialog. Choose Environment Variables… and you’ll see a list of defined environment variables for both the user and the system.
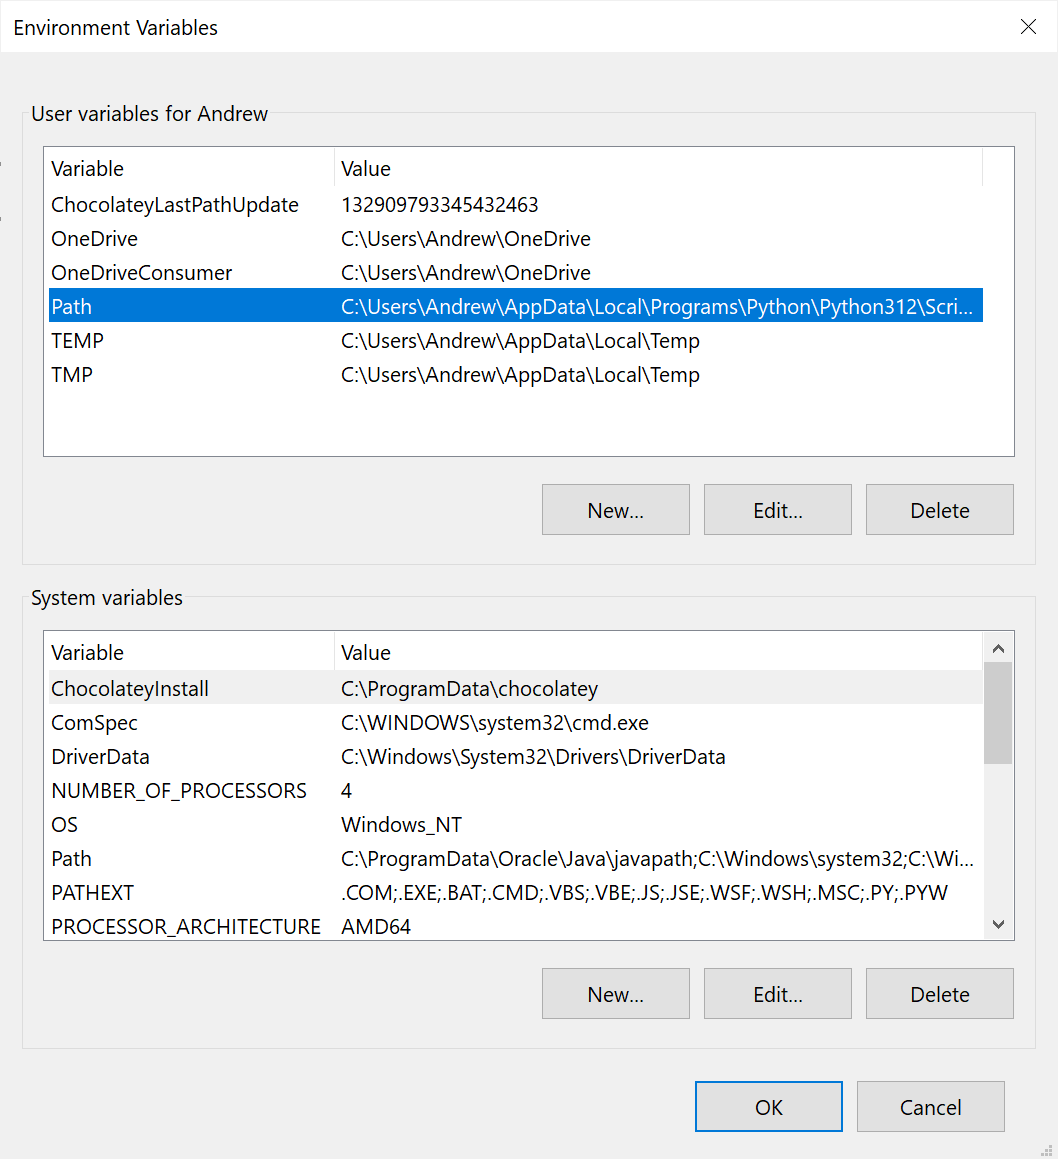
You may edit either your user Path or your system Path, but most people will probably want to edit their user Path. Click on that entry in the list and choose Edit….
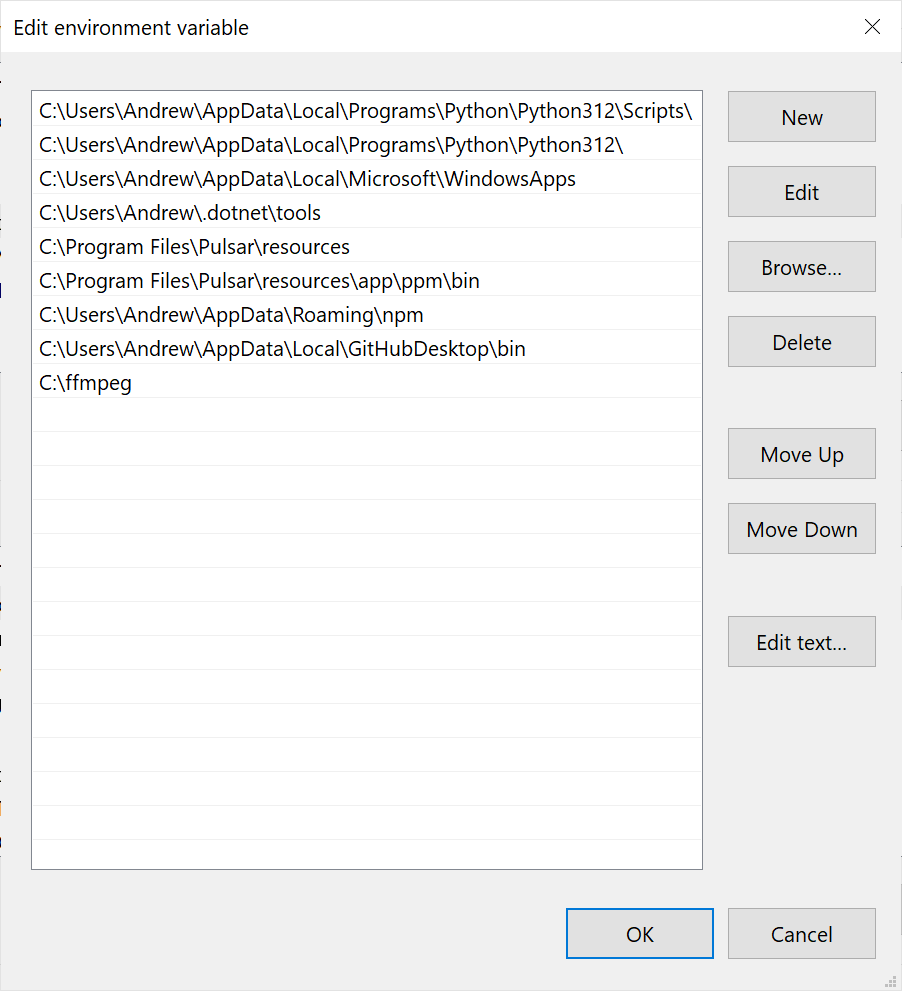
You’ll see a new window with a list of paths to directories on disk. You may add new lines to this list. Here’s what you should add…
- The path to
pulsar.cmd:[pulsar-installation-directory]\resources. - The path to
ppm.cmd:[pulsar-installation-directory]\resources\app\ppm\bin.
…replacing [pulsar-installation-directory] with the directory into which you installed Pulsar.
Click OK on a few windows until you’re back at the Settings app, then close and reopen your terminal application so that the new PATH setting takes effect. Now we’ll see if it worked.
Testing pulsar and ppm on Windows
Open a terminal application — Windows Terminal is available for free from the Microsoft Store, or you can use Windows’ built-in PowerShell — and run:
Get-Command pulsar
Get-Command ppm
If these commands are identified and point to paths within your Pulsar installation directory, you’ve succeeded.
The final test is to run them:
pulsar --version
ppm --version
Both of these commands should produce output in your terminal.